Saturday, 1 February 2025
Hutch Woodworking Plans for Stylish Home Storage
Hutch Woodworking Plans for Stylish Home Storage
The humble hutch, a versatile piece of furniture boasting both aesthetic appeal and considerable storage capacity, remains a timeless addition to any home. This article delves into the intricate details of crafting your own hutch, providing comprehensive woodworking plans designed to yield a stylish and functional storage solution perfectly tailored to your individual needs and preferences. From meticulous design considerations to precise construction techniques, we aim to equip you with the knowledge and confidence to embark on this rewarding woodworking project.

I. Design Considerations: Planning Your Personalized Hutch
Before initiating the construction phase, careful planning is paramount. The design process should be meticulous, ensuring the final product harmoniously integrates with your existing décor and effectively addresses your specific storage requirements. Several key considerations will influence your design choices:

A. Dimensions and Proportions:
The overall dimensions of your hutch will depend on the available space and your intended storage capacity. Consider the height, width, and depth carefully. A well-proportioned hutch maintains a pleasing aesthetic balance. Standard dimensions often serve as a helpful starting point, but customization is encouraged to suit your unique needs. Remember to factor in the thickness of the wood when calculating the internal dimensions to accommodate shelves and drawers.
B. Style and Aesthetics:
Your hutch's style should complement the overall aesthetic of your home. Will it be a rustic, farmhouse-style piece, a sleek and modern design, or a more traditional, ornate creation? This decision will influence the choice of wood, finish, and hardware. Consider incorporating stylistic elements such as decorative molding, carved details, or unique hardware to personalize your design.
C. Storage Functionality:
This aspect is crucial. Analyze your storage needs. How much storage space do you require? What types of items will you be storing? This will inform the number and placement of shelves, drawers, and any other storage compartments. Consider incorporating adjustable shelves for greater flexibility. Deep drawers might be suitable for bulky items, while shallower drawers are ideal for smaller objects.
D. Materials Selection:
The choice of wood significantly impacts the hutch's durability, aesthetic appeal, and overall cost. Hardwoods such as oak, maple, cherry, or walnut offer exceptional strength and a rich, luxurious appearance, but they command a higher price. Softwoods like pine or fir are more budget-friendly, but may require more careful handling during construction. Consider the wood's grain pattern, color, and workability when making your selection. Always source sustainably harvested wood to promote responsible environmental practices.
II. Construction Techniques: Bringing Your Design to Life
With your design finalized, the construction phase begins. Precision and accuracy are essential throughout this process to ensure the structural integrity and aesthetic appeal of your hutch.
A. Cutting and Joining:
Precisely cut all the wood components according to your detailed plans. Use a high-quality saw for clean, accurate cuts. Joinery techniques like mortise and tenon, dovetail, or biscuit joints offer superior strength and durability. For simpler designs, pocket hole joinery or robust screws can be used, ensuring proper alignment and reinforcement.
B. Assembling the Carcass:
Begin by assembling the main body or carcass of the hutch. Carefully align and secure the vertical and horizontal pieces using your chosen joinery method. Ensure all joints are tight and square. Clamping is crucial during assembly to prevent warping or misalignment. Once the carcass is assembled, check for any irregularities and make necessary adjustments.
C. Installing Shelves and Drawers:
Install shelves using shelf supports or dadoes cut into the side panels. Ensure the shelves are level and securely fastened. For drawers, build sturdy drawer boxes using dovetail joints or other strong joining methods. Install drawer slides to ensure smooth operation. Consider using high-quality drawer slides for heavy-duty drawers.
D. Adding Doors and Finishing Touches:
Install doors, ensuring proper alignment and clearance. Use hinges that are appropriate for the weight of the doors. Add any decorative molding or trim to enhance the aesthetic appeal of your hutch. Sand all surfaces smoothly to remove any imperfections before applying the finish.
E. Finishing:
Applying a finish protects the wood and enhances its natural beauty. Consider various options such as paint, stain, varnish, or lacquer. Apply multiple thin coats, allowing each coat to dry completely before applying the next. Sand lightly between coats for a smooth, even finish. A high-quality finish enhances the durability and longevity of your hutch.
III. Advanced Features and Customization Options
Enhance the functionality and aesthetic appeal of your hutch by incorporating these advanced features:
- Integrated Lighting: Incorporate LED strip lighting to illuminate the interior, showcasing your stored items and enhancing the hutch's ambiance.
- Glass Doors: Use glass doors to display cherished items while still providing protection from dust.
- Hidden Compartments: Add secret compartments for storing valuable items, enhancing the hutch's intrigue.
- Customizable Hardware: Select knobs, pulls, and hinges that complement the hutch's style and enhance its overall aesthetic appeal.
- Built-in Charging Stations: Integrate USB charging ports into the hutch for convenient device charging.
IV. Safety Precautions and Best Practices
Safety should be a primary concern throughout the woodworking process. Always follow these precautions:
- Wear appropriate safety gear: Safety glasses, hearing protection, and a dust mask are essential.
- Use sharp tools properly: Maintain sharp tools and use them correctly to avoid accidents.
- Clamp workpieces securely: Always clamp workpieces firmly to prevent movement during cutting or joining.
- Work in a well-ventilated area: Ensure adequate ventilation when using finishes and other potentially harmful substances.
- Follow manufacturer's instructions: Always refer to the manufacturer's instructions for tools, finishes, and other materials.
Constructing a hutch is a rewarding project that allows for creativity and personalization. By meticulously following these plans and exercising patience and precision, you can create a beautiful and functional piece of furniture that will enhance your home for years to come. Remember that careful planning and attention to detail are key to a successful outcome. Enjoy the process and the satisfaction of crafting your own unique hutch!
Saturday, 25 January 2025
Making a Wooden Jewelry Stand for Displaying Necklaces and Earrings
Craft a Stunning Wooden Jewelry Stand: A Step-by-Step Guide
Tired of tangled necklaces and earrings strewn across your dresser? Elevate your jewelry storage and display with a beautiful, handcrafted wooden jewelry stand. This project is surprisingly achievable, even for beginners, and the end result will be a stylish and functional addition to your bedroom or vanity. We'll guide you through each step, from choosing the right wood to adding the finishing touches, empowering you to create a unique piece that reflects your personal style.

Choosing Your Materials and Tools
The foundation of any successful project lies in selecting quality materials. For this jewelry stand, consider using a hardwood like oak or maple for its durability and beautiful grain. However, softer woods like pine work well too, especially if you're a beginner. Remember to choose wood that’s free from knots or significant imperfections. In terms of dimensions, aim for a base that's approximately 6 inches square and upright supports around 8-10 inches tall. Adjust these dimensions to suit your preference and the amount of jewelry you plan to display. You’ll also need a selection of tools: a saw (hand saw or circular saw), sandpaper (various grits), wood glue, clamps, a drill with various drill bits, and a finish of your choice (stain, paint, or varnish). Don’t forget safety glasses and a dust mask!

Essential Tools List:
- Saw (hand saw or circular saw)
- Sandpaper (various grits)
- Wood glue
- Clamps
- Drill with various drill bits
- Measuring tape and pencil
- Safety glasses and dust mask
- Wood finish (stain, paint, or varnish)
Building the Jewelry Stand: A Step-by-Step Process
Start by cutting your chosen wood into the necessary pieces. You will need one square piece for the base and four vertical pieces for the uprights. Precisely measure and cut these pieces, ensuring that your cuts are clean and straight. Next, carefully sand all the cut edges and surfaces using progressively finer grits of sandpaper for a smooth finish. This step significantly impacts the final look and feel of your jewelry stand. Now, apply wood glue to the ends of the upright pieces and firmly attach them to the corners of the square base. Secure them using clamps to ensure a strong and even bond while the glue dries completely. This usually takes around 24 hours. Once the glue is dry, you can remove the clamps.
Adding Decorative Elements (Optional):
Personalize your jewelry stand by incorporating additional features. Consider adding small hooks or dowels to hang necklaces. You can drill holes into the uprights at varying heights to create a charming and functional display. Alternatively, create small shelves by attaching thin pieces of wood horizontally across the uprights. Remember to sand these additions thoroughly before applying your chosen finish.
Finishing Touches: Enhancing the Beauty
Once the construction is complete, apply your chosen wood finish. Whether you opt for a rich stain to highlight the wood grain, a vibrant paint for a pop of color, or a clear varnish for a natural look, this step will protect the wood and enhance its beauty. Apply several thin coats, allowing each coat to dry completely before applying the next. This process will ensure a durable and even finish. After the finish has fully cured, your handcrafted wooden jewelry stand is ready to proudly display your treasured jewelry collection! Enjoy the satisfaction of creating something beautiful and functional with your own two hands!
Wednesday, 20 November 2024
Best DIY Woodworking Projects for Selling Online

Best DIY Woodworking Projects for Selling Online
The world of online marketplaces is booming, and with it, the demand for handcrafted goods is skyrocketing. Woodworking, a timeless craft, provides a unique opportunity to capitalize on this trend. With a little creativity and dedication, you can transform your woodworking skills into a successful online business. This article will explore some of the best DIY woodworking projects that are perfect for selling online, catering to various tastes and needs.
Practical and Functional Projects
Practical and functional items are always in demand, and woodworking is perfectly suited to create these necessities.
Cutting Boards
Cutting boards are an essential kitchen tool. You can create various designs using different woods, including maple, walnut, and cherry. Adding features like juice grooves or handles enhances functionality. Consider offering various sizes, shapes, and even personalized engravings.
Serving Trays
Serving trays offer elegance and practicality. You can create trays in various shapes and sizes, using different woods and finishes. Incorporate unique features like handles, decorative edges, or even built-in compartments for serving specific items.
Wooden Utensil Holders
Utensil holders are both functional and visually appealing. You can create them in various styles, incorporating elements like open compartments, slots for specific utensils, or even built-in magnets for knives. Choose from different woods and stains to match various kitchen aesthetics.
Decorative and Ornamental Projects
Decorative and ornamental pieces add personality and charm to any space.
Wall Clocks
Wall clocks are a great way to showcase your woodworking skills and creativity. You can create unique designs using different woods, finishes, and clock mechanisms. Consider offering customizable options like engraved names or special messages.
Wooden Picture Frames
Wooden picture frames are a classic and timeless decoration. You can create frames in various styles, incorporating different woods, finishes, and decorative elements. Offer frames in various sizes to cater to different photo dimensions.
Wooden Ornaments
Wooden ornaments are popular during the holidays. You can design various shapes, sizes, and themes. Consider incorporating personalized elements, such as engraved names or special messages. Offer themed ornaments for specific holidays like Christmas or Halloween.
Home Furniture Projects
Creating furniture offers the opportunity to showcase your woodworking skills and create stunning pieces that transform homes.
Small Wooden Benches
Small wooden benches are versatile and functional pieces that can be used in various rooms, including entryways, bedrooms, and even bathrooms. You can create different designs using different woods, finishes, and upholstery options.
Wooden Nightstands
Wooden nightstands are a perfect addition to any bedroom. You can create various styles using different woods, finishes, and drawer designs. Consider offering customization options, such as choosing the wood type or the number of drawers.
Wooden Coffee Tables
Wooden coffee tables are a centerpiece for any living room. You can create tables in various styles, using different woods, finishes, and shapes. Consider offering custom sizes and storage options to fit different spaces and needs.
Factors to Consider When Choosing Projects
Choosing the right woodworking projects to sell online requires careful consideration of several factors.
Target Audience
Identify your target audience. Are you targeting homeowners, young professionals, or families? Consider their needs, preferences, and lifestyle to create projects that resonate with them.
Skills and Experience
Evaluate your woodworking skills and experience. Choose projects that align with your current expertise and allow for room for growth. Consider starting with simpler projects and gradually expanding your repertoire as you gain more confidence and experience.
Market Demand
Research the market demand for specific woodworking projects. Use online marketplaces like Etsy and Amazon to identify popular items and gauge pricing. Consider seasonal trends and holidays to create projects that are in high demand during specific periods.
Profitability
Calculate the cost of materials, tools, and labor for each project. Determine the selling price that allows for profit margins. Consider your time investment and the value you bring to each project.
Tips for Success
To succeed in selling your woodworking projects online, it is crucial to follow these tips.
High-Quality Photography
Invest in high-quality photography to showcase your projects professionally. Use natural lighting and a clean backdrop to create visually appealing images. Consider hiring a professional photographer if necessary.
Detailed Product Descriptions
Provide detailed product descriptions that highlight the materials, construction techniques, and unique features of each project. Use descriptive language to create a sense of excitement and value for potential buyers.
Excellent Customer Service
Respond to inquiries promptly and professionally. Offer personalized service and address any concerns or questions. Building strong customer relationships is crucial for repeat business and positive reviews.
Consistent Branding
Develop a consistent brand identity that reflects your personal style and woodworking philosophy. Use a logo, color scheme, and font style across all your online platforms to create a cohesive brand image.
Online Marketing
Promote your woodworking projects on social media platforms like Instagram, Facebook, and Pinterest. Engage with your audience, share behind-the-scenes content, and run targeted ads to reach a wider market. Consider using email marketing to stay connected with potential customers.
Conclusion
The online marketplace offers a lucrative opportunity for woodworkers to showcase their talents and turn their passion into a profitable business. By choosing the right projects, embracing quality craftsmanship, and implementing effective marketing strategies, you can build a successful online woodworking business.
Tuesday, 19 November 2024
Profitable DIY Wood Decor Projects to Sell

Profitable DIY Wood Decor Projects to Sell
Looking for a creative and profitable way to make extra money? Look no further than woodworking! With a little creativity, some basic tools, and a passion for crafting, you can transform simple wood into beautiful and sought-after home decor items. The beauty of woodworking lies in its versatility â€" you can craft anything from rustic farmhouse signs to elegant modern wall art, appealing to a wide range of tastes. Not only is woodworking rewarding, but it's also a fantastic opportunity to tap into the booming demand for unique and handcrafted home decor.
Whether you're a seasoned woodworker or a complete beginner, this guide will equip you with the knowledge and inspiration to create profitable DIY wood decor projects. We'll explore popular trends, essential tools, and practical tips to help you get started. So, grab your hammer, saw, and imagination, and let's dive into the world of woodworking!
Hot Trends in Wood Decor
Staying on top of current trends is crucial for any seller. Luckily, the world of wood decor is constantly evolving, offering endless possibilities. Here are some popular trends to inspire your creations:
Rustic Farmhouse
The rustic farmhouse aesthetic remains incredibly popular, offering a warm and inviting atmosphere. Think distressed wood, natural textures, and simple designs. Popular items include:
- Wooden signs with inspirational quotes or family names
- Rustic picture frames
- Wooden trays for serving or organization
- Distressed wooden boxes for storage
Modern Minimalism
For those seeking a sleek and contemporary feel, modern minimalist decor is the way to go. This trend favors clean lines, simple shapes, and a focus on functionality. Some popular items include:
- Geometric wall art
- Minimalist shelves
- Wooden planters with geometric shapes
- Wooden cutting boards with minimalist designs
Bohemian Chic
The bohemian aesthetic is all about embracing color, texture, and unique finds. Wood decor with a bohemian flair often features vibrant colors, intricate patterns, and a touch of ethnic inspiration. Popular items include:
- Mandala-inspired wooden wall art
- Painted wooden trays with ethnic patterns
- Wooden dream catchers
- Wall-mounted wooden shelves with natural elements
Essential Tools for Wood Decor
Before you start crafting, it's essential to have the right tools to ensure your projects are safe, efficient, and successful. Here's a list of essential tools for basic woodworking:
- Saw: A handsaw or circular saw will allow you to cut wood to your desired dimensions.
- Hammer: Used for driving nails and securing your pieces.
- Screwdriver: A versatile tool for attaching and securing pieces. Consider a cordless drill for added convenience.
- Measuring Tape: Essential for precise cuts and ensuring accurate dimensions.
- Sandpaper: Smoothing out rough edges and creating a polished finish. Consider a sanding block for easier sanding.
- Wood Glue: Bonding your wood pieces together securely. Choose a high-quality wood glue for lasting durability.
Tips for Making Profitable Wood Decor
Now that you know the trends and have gathered your tools, here are some valuable tips to help you create successful and profitable wood decor projects:
Target a Niche
Specializing in a specific niche can set you apart from the competition and attract a dedicated customer base. Consider focusing on a specific style (like farmhouse or modern), a particular material (such as reclaimed wood), or a specific theme (like nautical or woodland).
Craft High-Quality Products
Use high-quality wood and finishes to ensure your pieces are durable and visually appealing. This will create a positive impression on customers and encourage repeat business.
Price Competitively
Research your competitors' pricing and ensure your prices are competitive while still reflecting the value of your handmade products.
Promote Your Work
Create a strong online presence through social media and a website or online shop. Utilize platforms like Etsy or Facebook Marketplace to showcase your work and reach a wider audience. Consider participating in craft fairs and markets to connect with potential customers directly.
Ideas for DIY Wood Decor Projects
Ready to get started? Here are some DIY wood decor projects that are popular and relatively easy to make:
- Wooden Signs: Perfect for adding a personal touch to any space. Experiment with different fonts, colors, and messages to create unique designs.
- Rustic Picture Frames: Use salvaged wood or reclaimed pallets to create rustic and charming picture frames.
- Wooden Coasters: Simple to make and a great way to personalize your home decor. Use wood scraps or coasters with a natural finish.
- Wooden Jewelry Hanger: Create a beautiful and functional piece with branches, reclaimed wood, or pallet wood. Add hooks or pegs to hang necklaces and earrings.
Woodworking can be a fulfilling and profitable hobby. By embracing creativity, staying informed about trends, and following these tips, you can transform your woodworking skills into a successful business venture. So, grab your tools and start crafting beautiful and unique wood decor that's sure to impress!
Monday, 18 November 2024
Step-by-Step Guide to Making Wooden Chess Tables for Sale

Crafting Wooden Chess Tables for Sale: A Step-by-Step Guide
Hey there, fellow chess enthusiasts! So, you're thinking about making wooden chess tables for sale, huh? That's awesome! It's a great way to combine your passion for chess with your woodworking skills and potentially even turn it into a side hustle. Don't worry if you're a beginner â€" we'll walk through the process step-by-step, from design to finishing, so you can create beautiful and functional chess tables that people will love.1. The Design Process: Bringing Your Vision to Life
Before you grab your tools, it's crucial to have a solid design in mind. This is where your creativity shines! Consider these key factors:
a. Size and Dimensions
The standard chessboard size is 19 x 19 inches, but you can adjust the table dimensions to fit your preference. Remember to factor in enough space around the board for the players to move comfortably.
b. Style and Aesthetics
Think about the overall look and feel you want to achieve. Do you prefer a classic, traditional design? A modern, minimalist style? Or something unique and quirky? The style will guide your choice of wood, finish, and details.
c. Functional Considerations
Think about how you want the table to be used. Will it have drawers for storing pieces? Will it be foldable for easy storage? These practical aspects will impact the design.
d. Sketching It Out
Once you've got a general idea, put it down on paper. Sketch out the table's shape, dimensions, and any special features. Don't be afraid to experiment and play around with different designs until you're satisfied.
2. Gathering Your Materials and Tools
Now it's time to gather the materials and tools you'll need.
a. Wood Selection
Choosing the right wood is essential. Here are some popular options for chess tables:
- Hardwoods: Maple, cherry, oak, walnut â€" these woods are durable, beautiful, and offer excellent grain patterns.
- Softwoods: Pine, cedar, redwood â€" these woods are more budget-friendly and offer a natural, rustic look.
- Exotic Woods: Mahogany, rosewood, zebrawood â€" these woods add a touch of luxury and are known for their unique patterns and colors.
Think about the style you're going for and your budget when deciding.
b. Other Materials
In addition to wood, you'll need:
- Chessboard: You can purchase a pre-made chessboard or create your own from wood.
- Hardware: Hinges, drawer slides, screws, glue, wood filler.
- Finishing Supplies: Wood stain, varnish, sandpaper, brushes, cloths.
c. Tools
For building your chess table, you'll need a variety of tools:
- Saw: Circular saw, table saw, jigsaw â€" for cutting the wood.
- Drill: For drilling holes for screws and hinges.
- Sanding Tools: Sanders, sandpaper â€" for smoothing the wood surfaces.
- Clamps: For holding pieces together while gluing or assembling.
- Measuring Tools: Tape measure, ruler, protractor.
3. Cutting and Assembling the Table
Alright, let's get to the fun part! It's time to bring your design to life:
a. Cutting the Wood
Using your chosen saw, carefully cut the wood to your specified dimensions. It's always a good idea to make your cuts slightly larger than needed and then trim to the exact size once the table is assembled. This gives you some wiggle room in case of any measurement errors.
b. Joining the Pieces
Once all the pieces are cut, you can start assembling the table. You can use a variety of methods, including:- Gluing: Use wood glue to join the pieces together. Ensure you apply a generous amount of glue and clamp the pieces firmly in place until the glue dries.
- Screwing: Use screws to secure the pieces together, especially for areas that will be under stress, like the legs or tabletop.
- Dowel Joints: Drill holes and insert dowels to create strong, hidden joints.
c. Adding Special Features
If you're incorporating drawers or other features, now is the time to add them. Follow the instructions for the hardware you've purchased to ensure a smooth installation.
4. Sanding and Finishing
Your chess table is taking shape! Now it's time to smooth out the rough edges and give it that final polish:
a. Sanding
Sand the entire surface of the table using progressively finer grit sandpaper, starting with rougher grits and ending with fine grits. This removes any imperfections and creates a smooth, even surface.
b. Applying the Finish
Choosing the right finish for your chess table is important. Consider these factors:
- Stain: To add color and enhance the wood's natural grain pattern.
- Varnish: To protect the wood from scratches, spills, and moisture. You can choose from various finishes, such as polyurethane, oil-based, or water-based varnishes, depending on your preference and the look you want to achieve.
Follow the instructions on your chosen finish carefully. Apply multiple thin coats, sanding lightly between coats for a smooth, even finish.
5. Attaching the Chessboard
Now comes the moment of truth! Attach your chessboard to the table. You can use:
- Glue: Apply a strong wood glue to the bottom of the chessboard and place it securely on the tabletop.
- Screws: For a more permanent attachment, you can drill pilot holes and screw the chessboard to the tabletop.
6. Adding the Final Touches
You're almost there! Time to add the finishing touches to your chess table:
- Hardware: Install any remaining hardware, such as drawer pulls or hinges.
- Decorative Elements: Consider adding decorative elements like inlays, carving, or painted details to enhance the table's look.
- Chess Pieces: If you haven't already, choose a set of chess pieces that complements the table's style.
7. Marketing and Selling Your Chess Tables
Now that you've created a beautiful chess table, it's time to share it with the world!
a. Pricing
Pricing your chess tables depends on factors such as the quality of wood, the complexity of the design, and your labor costs. Do some research on similar chess tables being sold to get an idea of pricing. It's important to price your tables competitively but also fairly, considering the time and effort you put into them.
b. Finding Customers
There are several ways to sell your chess tables:
- Online Marketplaces: Sites like Etsy, eBay, and Facebook Marketplace offer a great platform to showcase your work to a wider audience.
- Local Craft Fairs and Markets: Participating in local events allows you to connect directly with potential buyers and get immediate feedback on your work.
- Social Media: Use platforms like Instagram and Facebook to promote your chess tables and build a following.
- Word-of-Mouth: Tell your friends, family, and fellow chess enthusiasts about your tables. Don't underestimate the power of word-of-mouth marketing.
c. Creating a Brand
Building a brand for your chess tables can help you stand out from the competition. Consider creating a unique brand name, logo, and website to showcase your work and connect with customers.
Commonly Asked Questions
Q: How much does it cost to make a chess table?
The cost can vary depending on the wood you choose, the design complexity, and the finishing materials. Expect to spend anywhere from a few hundred dollars to a few thousand dollars.
Q: How long does it take to build a chess table?
The time required depends on the complexity of the design and your experience level. You can expect it to take anywhere from a few days to several weeks.
Q: Do I need any woodworking experience to make a chess table?
While some woodworking experience is helpful, it's not strictly necessary. Start with a simple design and be willing to learn as you go. There are plenty of resources online and in woodworking books that can guide you through the process.
Q: Where can I get more information about woodworking techniques?
The internet is a treasure trove of woodworking information! Search for "woodworking tutorials" or "beginner woodworking projects" to find helpful videos, articles, and forums.
Q: How do I promote my chess tables online?
Use high-quality photos and videos to showcase your tables. Write compelling descriptions highlighting the design features and craftsmanship. Engage with potential customers on social media and online marketplaces to build relationships and promote your brand.
Building wooden chess tables for sale can be a rewarding and fun experience. It combines your passion for chess with your creative skills and potentially even turns into a profitable venture. So, go ahead, unleash your inner craftsman and create some beautiful chess tables that will be cherished for years to come!
Wednesday, 13 November 2024
Unique Birdhouse Ideas That Attract Shoppers
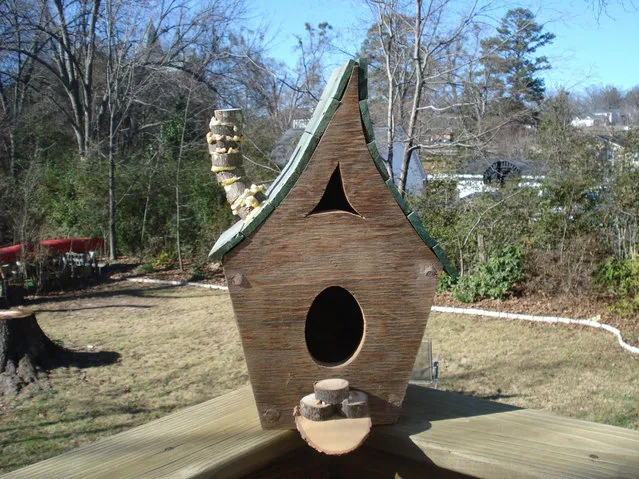
Unique Birdhouse Ideas That Attract Shoppers
Birdhouses aren't just for birds anymore. They've become a beloved decorative element for gardens and patios, adding a touch of whimsy and charm. But with so many birdhouses on the market, how do you stand out? The key is to offer something unique, something that catches the eye and appeals to a shopper's desire for something special.
Embrace the Unexpected
Think outside the traditional birdhouse box. Why stick to simple wooden structures when you can create something truly unique?
Upcycled Wonders
Give old objects a new lease on life. Transform a vintage teapot into a charming birdhouse, or repurpose an old watering can into a quirky nesting site. Shoppers love the story behind upcycled items, and the eco-friendly aspect adds another layer of appeal.
Nature-Inspired Designs
Draw inspiration from the natural world. Craft birdhouses shaped like mushrooms, acorns, or even miniature houses with thatched roofs. These designs blend seamlessly with the garden environment, creating a sense of harmony.
Add a Personal Touch
Birdhouses are more than just functional shelters; they're also expressions of personality.
Personalized Details
Offer customization options. Let shoppers choose the paint colors, add their initials, or even have a small plaque engraved with a special message. Personalization creates a sense of ownership and makes the birdhouse truly unique.
Themed Collections
Create themed birdhouse collections around popular interests. For example, a nautical collection could feature birdhouses shaped like boats or lighthouses, while a whimsical collection might include whimsical designs with fairy doors or miniature gardens. These themed collections provide shoppers with a curated selection, making it easier for them to find something that suits their taste.
Focus on Functionality
While aesthetics are important, don't forget the practical aspects.
Bird-Friendly Features
Consider features that attract and benefit birds. This could include:
- Multiple entry points to cater to different bird species.
- A removable bottom panel for cleaning.
- Built-in ventilation to prevent moisture buildup.
Sustainable Materials
Choose eco-friendly materials like recycled wood or bamboo. Shoppers are increasingly conscious of environmental impact, and using sustainable materials will resonate with their values.
Marketing Your Unique Birdhouses
Once you've created your unique birdhouses, it's time to showcase them to the world.
High-Quality Photography
Professional photos that highlight the design, detail, and craftsmanship of your birdhouses are essential. Use natural lighting and focus on the birdhouse's unique features.
Engage on Social Media
Share your birdhouses on platforms like Instagram and Pinterest, using relevant hashtags and engaging descriptions. Show the birdhouses in their natural environment, highlighting their beauty and practicality.
Online Marketplaces
List your birdhouses on Etsy, Amazon Handmade, and other online marketplaces. These platforms offer a wider reach to potential customers and allow you to showcase your products to a targeted audience.
By combining unique designs, personal touches, and a focus on functionality, you can create birdhouses that stand out from the competition and attract shoppers looking for something truly special.
Handcrafted Wood Gifts for Every Occasion
Handcrafted Wood Gifts for Every Occasion: Show You Care with a Piece of Heart
Looking for a gift that's unique, meaningful, and sure to impress? Look no further than handcrafted wood gifts! These one-of-a-kind treasures are made with love and care, and they're perfect for celebrating any occasion. From birthdays and anniversaries to weddings and holidays, there's a handcrafted wood gift out there for everyone.
But what makes handcrafted wood gifts so special? Well, let me tell you. They're not just pretty to look at â€" they hold a certain warmth and authenticity that mass-produced items simply can't match. Plus, they're often made with sustainable and eco-friendly materials, making them a great choice for the environmentally conscious gift-giver.
Ready to dive into the wonderful world of handcrafted wood gifts? Let's get started!
For the Homebody
Let's face it, some people just love being at home. They find joy in the simple things â€" cozy nights in, a good book, and a warm cup of tea. For these folks, a handcrafted wood gift is the perfect way to show your appreciation for their love of all things domestic.
Personalized Cutting Boards
A personalized cutting board is a practical and stylish gift for any home cook. You can have it engraved with their name, a special date, or even a funny quote. And since it's handcrafted from beautiful wood, it'll be a piece they treasure for years to come.
Wooden Serving Trays
A wooden serving tray is a versatile piece of furniture that can be used for everything from serving snacks and drinks to displaying decorative items. Choose a tray with a unique design, or opt for a simple and elegant style. Either way, it's a gift that's sure to be appreciated.
Wooden Coasters
A set of handcrafted wooden coasters is a thoughtful gift for anyone who loves to entertain. They add a touch of rustic charm to any coffee table, and they're perfect for protecting your furniture from water rings. You can even find coasters with unique designs or engravings, making them a truly personal gift.
For the Adventurous Soul
Know someone who loves to explore the great outdoors? A handcrafted wood gift is the perfect way to inspire their wanderlust and celebrate their love of adventure.
Wooden Campfire Accessories
From fire starters and grilling tools to wooden spoons and cutting boards, there are tons of handcrafted wood gifts perfect for campers and outdoor enthusiasts. They'll appreciate the quality and durability of these pieces, and they'll be a reminder of your thoughtful gift every time they head out on an adventure.
Personalized Wine Tumblers
A personalized wine tumbler is a great gift for anyone who enjoys a glass of wine (or beer, or even coffee) while hiking or camping. They'll love the unique design and the fact that it keeps their drinks cold or hot for hours.
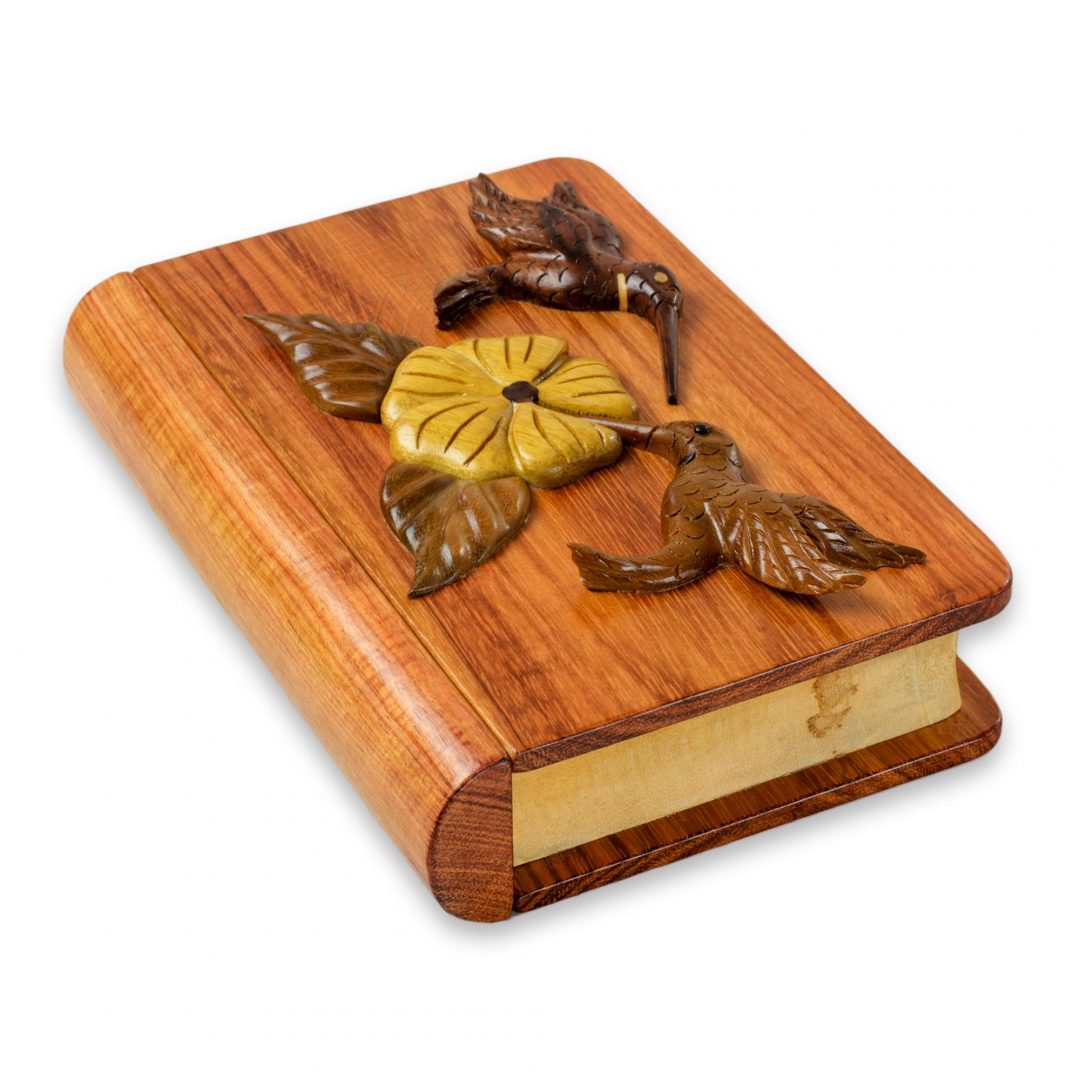
Wooden Jewelry Boxes
If your adventurous soul is also a bit of a jewelry lover, a handcrafted wooden jewelry box is a great gift. It's the perfect place to store their favorite pieces, and it's a beautiful addition to any bedroom or travel bag.
For the Techie
We all know a techie who has everything. But don't worry â€" there are still plenty of handcrafted wood gifts that they'll love. These gifts add a touch of warmth and personality to their tech-filled lives.
Wooden Phone Docking Stations
A wooden phone docking station is a practical and stylish way to keep their phone charged and organized. Choose a design that complements their style, and they'll be sure to appreciate this thoughtful gift.
Wooden Laptop Stands
A wooden laptop stand is a great way to improve their posture and ergonomics while working. It also adds a touch of sophistication to their workspace, making it a gift they'll use and appreciate every day.
Wooden Headphones Stands
A wooden headphone stand is a unique and functional way to keep their headphones organized and tangle-free. Plus, it adds a touch of personality to their desk, making it a great gift for anyone who loves their tech.
For the Artist
Creativity comes in all forms, and handcrafted wood gifts are perfect for celebrating the artists in your life. Whether they're painters, musicians, or writers, there's a gift out there that's sure to spark their creative spirit.
Wooden Easels
A handcrafted wooden easel is a beautiful and functional gift for any painter. It provides a sturdy surface for their canvases, and it's a piece they'll cherish for years to come.
Personalized Music Boxes
For the musician in your life, a personalized music box is a heartwarming and nostalgic gift. You can choose a melody that's special to them, or even have the box engraved with a meaningful quote or message.
Wooden Pencils and Pens
For the writer, a set of handcrafted wooden pencils or pens is a beautiful and practical gift. The smooth writing experience will inspire them to create their next masterpiece.
For the Special Occasions
Sometimes you need a gift that's just a little bit extra special. A handcrafted wood gift is perfect for celebrating milestones, like weddings, anniversaries, and graduations. It's a unique and thoughtful way to show your love and appreciation.
Engraved Wooden Picture Frames
An engraved wooden picture frame is a classic gift that's always appreciated. You can personalize it with a special date, a meaningful quote, or even a photo. It's a beautiful way to preserve memories and show your love.
Wooden Jewelry Boxes
A handcrafted wooden jewelry box is a luxurious and sentimental gift for a wedding or anniversary. It's a place to store precious keepsakes and a reminder of your love for years to come.
Wooden Keepsake Boxes
A wooden keepsake box is a versatile gift that can be used for anything from storing jewelry to holding special memories. It's a thoughtful and practical gift that's sure to be cherished.
Finding the Perfect Gift
With so many amazing handcrafted wood gifts to choose from, you're sure to find the perfect one for your loved one. Just remember to consider their interests, hobbies, and style when making your selection. And don't forget to personalize the gift with a special message or engraving. It's the little details that make all the difference.
So, what are you waiting for? Start shopping for handcrafted wood gifts today and show your loved ones just how much you care.